Server installation
The following steps outline the installation process for the Bottle Rocket server.
As this is a self-hosted solution, the onus of responsibility for securing and isolating your server from unwanted or malicious network traffic falls to you, the administrator.
While Bottle Rocket has been developed with security front-of-mind, the very nature of self-hosted solutions means that an inexperienced user may inadvertently expose their deployment with deficiencies in security.
Please seek out additional information and/or resources if you are unsure how to deploy this service securely.
Requirements
Docker
To maximize compatibility, Bottle Rocket is deployed as a Docker container.
This means you will need to install Docker on your server, or have an existing Docker-capable server, in order to deploy the Bottle Rocket server.
MongoDb
Bottle Rocket uses MongoDB as its principal database and will require an accessible MongoDB server instance (with a provisioned admin account) to connect to.
Alternatively, you can use the supplied docker-compose file to run your own MongoDB Docker container alongside the Bottle Rocket server container.
Installation
The Bottle Rocket service is comprised of two separate Docker images:
- An API server that connects directly to file storage and the MongoDB database
- A UI app that allows simpler administration of the Bottle Rocket server
For convenience, the included docker-compose.yml file includes setup of both images.
Additionally, the compose file also isolates all three images (UI, API, MongoDB) into a separate Docker network.
Pull the latest Docker images
With Docker installed on your server, run the following commands to pull the latest Bottle Rocket Docker images:
docker pull ghcr.io/gman-au/bottle-rocket-server/bottle-rocket-server-api:latest
docker pull ghcr.io/gman-au/bottle-rocket-server/bottle-rocket-server-web:latest
Running the Docker compose file (recommended)
- Download the
docker-compose.ymland.envfiles from the server repository. - You can adjust the default values in the
.envfile as needed if you wish to modify the MongoDB defaults or network name. - In a terminal / shell window, navigate to the download location and run the following command to start the compose action:
docker compose up -d
- To stop the containers, run:
docker compose down
Running the API image (standalone)
Port configuration
- By default, the API image will run on (internal) port 8080.
- Configure the external port as desired e.g.
-p 3001:8080
Bind mounts
- Captured scans will be stored in a configured path, so set this up as a
bind mount e.g.
-v /api-scans:/bottle-rocket/scans
Environment variables
| Variable | Description |
|---|---|
LocalBlobConfigurationOptions__LocalBasePath | Set this to the base folder on the server where captures will be stored. e.g. if you have mounted the volume as in the above example, this value would be /bottle-rocket. |
LocalBlobConfigurationOptions__LocalSubfolder | Set this to the dedicated sub folder on the server where captures will be stored. e.g. if you have mounted the volume as in the above example, this value would be scans. |
MongoDbConfigurationOptions__ConnectionString | Set this to the relative connection string to connect to the desired MongoDB database. You will need to include the admin credentials in this connection string value. |
MongoDbConfigurationOptions__DatabaseName | Set this to the name of the Bottle Rocket database as created in the MongoDB database. It can be any MongoDB-compatible database name but it mustn't conflict with any existing database on that DB server. BottleRocket is a good value. |
Running the UI image (standalone)
Port configuration
- By default, the API image will run on (internal) port 8080.
- Configure the external port as desired e.g.
-p 3000:8080
Environment variables
| Variable | Description |
|---|---|
ApiConfigurationOptions__BaseUrl | Set this to the relative base URL of the running API image. You may be able to use http://127.0.0.1:3001 or http://localhost:3001 if you deployed the API image standalone as above; otherwise you may need to refer to the running container by its name. |
Completing setup
Extract the root admin account credentials
Upon initial startup, the API server will perform the following:
- Connect to the configured MongoDB database
- Check for the existence of a root
adminaccount - If the root
adminaccount cannot be found, create one with a random password
While the container is running, run the following console / shell command to view the container logs:
docker logs <container_name_or_id>
Where <container_name_or_id> is the name or ID of the running API container.
If this command is successful you should be able to find the following log entries or similar:
  Checking first-start initialization...
  FIRST START DETECTED - No active admin account found
  Creating initial admin account...
  ================================================================================
  FIRST START - ADMIN ACCOUNT CREATED
  ================================================================================
  Username: admin
  Password: password123
  ================================================================================
  SAVE THESE CREDENTIALS - They will not be shown again!
  Use these credentials to log in and create your user account.
  The admin account will be deactivated after you create your first user.
  ================================================================================
You now have the credentials for the root admin account.
You will use these to complete the Bottle Rocket server setup.
Create your (administrator) account
- With the UI container running, navigate to the container via the export port you have configured.
- In the above example this would be
http://localhost:3000
- In the above example this would be
- If everything is running correctly, you should see the Bottle Rocket UI homepage in your browser.

- Click the Login button in the sidebar.
- You should be presented with a Login screen.
- Enter the root
adminusername and password you extracted from the API container logs. - Click Login.
- Enter the root

- You should now be presented with a Complete Setup screen, prompting you to enter your new administrator account details.
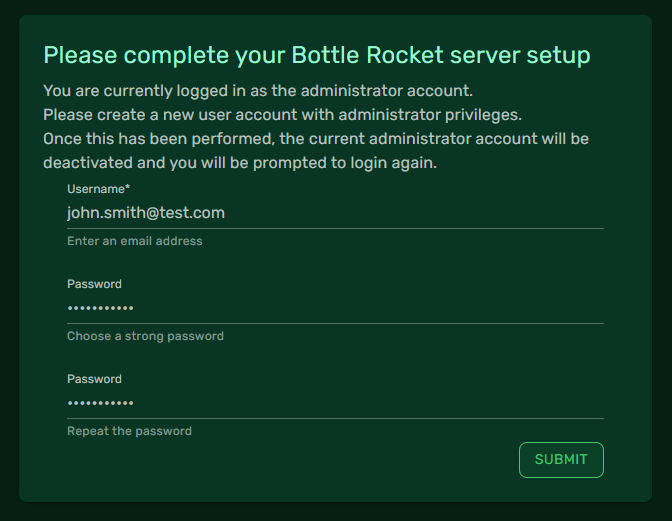
- Enter the new details as guided (the
Usernamefield should take the form of an email address).
Note down these credentials as you will need them when configuring the mobile app.
- Click Submit.
If successful, after clicking Submit, three things will happen:
- The new administrator account you have configured will be created.
- The root
adminaccount will be deactivated. - The
adminaccount will log out immediately and you will be returned to the home page.